

How to Clean Reusable Filters Without Damage
A reusable furnace filter can more than 10 years, but only if I clean it gently and let it dry all the way. If I use high pressure, hot water over 120°F, bleach, or stiff brushes, I can damage the filter media, bend the frame, and cut airflow.
Here’s the short answer:
- I turn off the HVAC system first
- I remove the filter carefully and check the airflow arrow
- I vacuum loose dust with a soft brush
- I rinse with lukewarm water at 80–100°F using low pressure
- I wash from the clean side to the dirty side
- I skip pressure washers, bleach, ammonia, and abrasive tools
- I air-dry the filter fully before putting it back
- I check it every 30 days and clean it sooner if dust builds up
A dirty reusable filter can restrict airflow and make the system run longer. A damp filter can lead to mold. And rough washing can strip away the electrostatic layer that helps trap dust, pollen, pet dander, and mold spores.
If I want the filter to keep working well, the rule is simple: clean lightly, dry fully, reinstall the right way, and stick to a schedule.
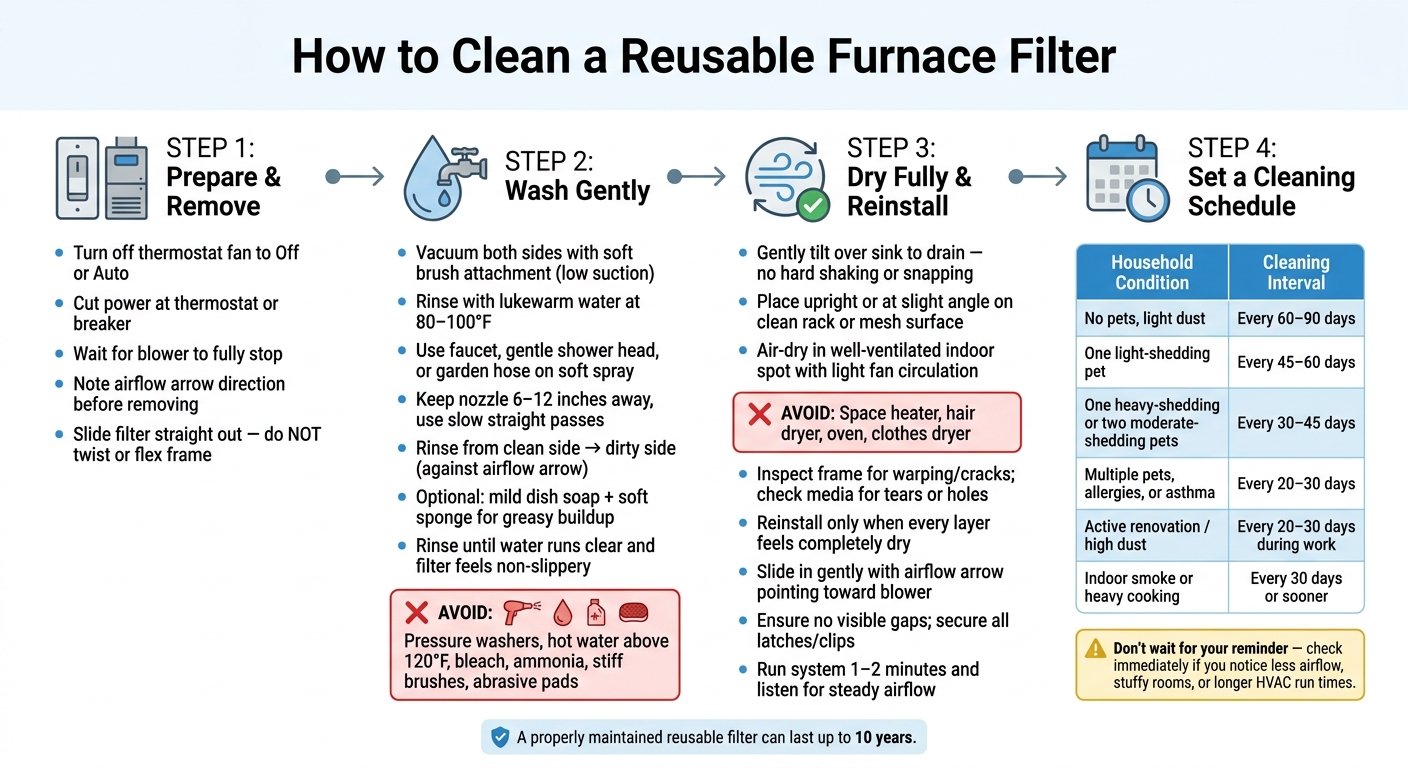
How to Clean a Reusable Furnace Filter: Step-by-Step Guide
sbb-itb-adeab55
Step 1: Prepare Your HVAC System and Remove the Filter
Before you handle the filter, shut the system down.
Turn Off the System and Open the Filter Compartment
Set the thermostat fan to Off or Auto. Then shut off power at the thermostat or the breaker so the blower can't start while you're working. Wait until the blower comes to a full stop before you open the access panel.
Note the Airflow Direction Before Pulling the Filter Out and Carry the Filter Without Twisting or Flexing the Frame
Check the airflow arrow before you remove the filter. Then slide it straight out. Don't twist it or bend the frame. Set it aside until you're ready for the wash step.
Step 2: Wash the Filter Using Low-Pressure, Non-Abrasive Methods
Clean the filter with low pressure so you don’t damage the filter material or bend the frame.
Remove Loose Dust Before Rinsing
Set the filter on a flat surface. Vacuum both sides with a soft brush attachment using low suction. Start on the clean side, then flip it over and do the dirty side.
This clears away loose dust before water hits the filter. Once that dust is gone, rinse the filter gently.
Rinse With Lukewarm Water and Mild Detergent
Use a faucet, a gentle shower head, or a garden hose set to a soft spray. Never use a jet or strong stream. The water should be lukewarm, about 80–100°F.
Rinse from the clean side toward the dirty side. Go against the airflow arrow so debris washes out instead of getting pushed deeper into the filter material.
Keep the nozzle about 6–12 inches away and move it in slow, straight passes. If there’s greasy buildup, use a small amount of mild dish soap with a soft sponge. Then rinse well until the water runs completely clear and the filter no longer feels slippery.
After rinsing, move straight to air-drying before reinstalling.
What to Avoid: Pressure Washers, Bleach, and Stiff Brushes
Skip anything that can tear, weaken, or misshape the filter:
- Pressure washers
- Hot water above 120°F
- Bleach
- Ammonia
- Stiff brushes
- Abrasive pads
After rinsing, let the filter air-dry all the way before reinstalling it.
Step 3: Dry the Filter Fully and Reinstall It Correctly
After the final rinse, move straight to drying. If the filter sits damp, it can pick up new dust fast. And if you put it back too soon, you can end up with mold, weak airflow, and more dirt stuck in the filter. ElectroDust recommends having 2 filters on hand; while one is drying you can slide in a clean one and have no down time.
Air-Dry the Filter Completely Before Reinstalling
After rinsing, hold the filter over a sink and gently tilt it so the water can drain out. Skip the hard shaking or snapping. That can bend the frame or pull the filter material loose.
Next, place the filter upright or at a slight angle with drainage holes facing down, on a clean rack or mesh surface. The goal is simple: let water drain from the holes and have air hit both sides. Put it in a clean indoor spot with good ventilation and light fan circulation. If your home is humid, drying may take a bit longer.
Don't use a space heater, hair dryer, oven, or clothes dryer. Too much direct heat can warp plastic frames, weaken adhesives, and shrink or distort synthetic filter fibers.
Only put the filter back once every layer feels fully dry.
Check for Warping, Tears, or Loose Filter Material
Before you reinstall it, take a quick look. Check the frame for warping or cracks. Then inspect the media for tears, holes, frayed edges, or loose seams. If you spot damage - or the filter still feels damp - replace it.
If everything looks good, slide it back into place with the airflow arrow facing the right direction.
Slide the Filter Back In With the Airflow Arrow Facing the Blower
Find the airflow arrow on the filter frame and point it toward the blower. Slide the filter in gently by the frame. If it doesn't go in easily, stop and check the direction instead of forcing it.
Once the filter is seated, make sure there are no visible gaps around the edges. Then close the access panel all the way and secure every latch or clip. That helps keep the system from pulling in unfiltered air from the area around it.
Turn the power back on at the thermostat or disconnect switch, then let the system run for a minute or two. Stand near the air handler and listen for steady airflow.
Rattling, whistling, or loud suction at the return grille are signs the filter may be misaligned or the panel isn't fully closed.
If you hear anything off, shut the system down and check the filter and panel again before running it.
Step 4: Set a Cleaning Schedule and Avoid Future Damage
Clean Every 30 Days, or More Often in Dusty Homes
Once the filter is clean and dry, timing is the next thing to lock in.
Check the filter every month. A recurring reminder every 30 days makes this easy. If the filter looks gray, dark, or plainly dusty, clean it right away.
How often you wash it depends on what’s going on in your home. A house with no pets is one thing. A home with shedding pets, smoke, or remodeling dust is a whole different story.
| Household Condition | Recommended Cleaning Interval |
|---|---|
| No pets, light dust, typical use | Every 30 days |
| One light-shedding pet, no allergies | Every 25-30 days |
| One heavy-shedding pet or two moderate-shedding pets | Every 20-30 days |
| Multiple pets, allergies, or asthma | Every 15-30 days |
| Active renovation or high dust levels | Every 15-30 days during work |
| Indoor smoke or heavy cooking fumes | Every 15-30 days or sooner |
If you notice less airflow from vents, stuffy rooms, or longer HVAC run times, don’t wait for the next reminder. Those are clear signs the filter needs attention now. Regular cleaning helps stop buildup from restricting airflow and putting extra wear on the filter.
Follow the Same Gentle Process Every Time
A good schedule helps, but the cleaning method matters just as much. Use the same gentle process every time so you don’t bend the frame or damage the filter media.
That means no rough handling, no harsh chemicals, and no pressure washing. A reusable filter can last, but only if you treat it with a light touch.
Conclusion: Keep Your Filter Working With the Right Care Habits
The care habits that protect a reusable filter are simple: gentle removal, mild cleaning, no harsh chemicals or pressure washing, complete drying, and correct reinstallation. Regular, gentle cleaning helps protect the frame, the media, and proper airflow over time.
FAQs
How long does a reusable furnace filter take to dry?
A reusable furnace filter often needs a few hours to air-dry all the way, though some models can dry in 20 to 30 minutes. The main thing is simple: make sure the filter is fully dry before you put it back in. If it goes back in damp, you could end up with mold or mildew inside your HVAC system.
To help it dry well, lay it flat on a drying rack or on clean towels in a spot with good airflow. Sunlight can help too. A lot of homeowners keep a spare filter around, so one can dry while the other is in use.
Can I clean a reusable filter if it has grease or sticky buildup?
Yes. If your reusable filter has grease or sticky buildup, rinse it with a mild detergent.
Start by vacuuming off any loose dust. Then rinse from the clean side toward the dirty side so you don’t push debris deeper into the filter. Let it air-dry all the way before you put it back in.
How do I know if my reusable filter is too damaged to reuse?
Stop using the filter again if the media or frame is damaged after proper washing and drying. That includes issues like warping or a surface that’s become hard to clean.
If the filter looks gray or dusty when you hold it up to a light, clean it first. And don’t put it back in until it’s fully air-dried. Any leftover moisture can lead to mold and odors.